
This past week, I had a random inspiration to transform some coconuts into rhythmic shakers. After some contemplation, I decided to go to the grocery store, buy some coconuts, and give it a shot.
It took me about 6 hours spread out over a few days, not including the time I left things overnight for glue or paint to dry. I shot overhead video the entire time, which I sped up and edited down to about 6 minutes. I tried my best to sync the motions to a couple of tracks that I had recorded a while back. I think you’ll enjoy the results.
I learned quite a few things along the way:
- Coconuts are way harder to cut through than I thought. I’ve opened them with a hammer, which is simple, but I had never tried to saw through one
- Rice makes a very pleasant shaker sound. Couscous sounds more like a child’s rattle
- Wood glue works great on coconuts
Here’s a breakdown of the process…
Step 1 – Shave
The first thing I wanted to do was clean the coconuts up a bit. To start, I used a Morakniv Wood Carving Knife to clean up most of the hairiness. The Morakniv is a knife I bought years ago to try my luck at whittling. It turns out I’m not very good at whittling, but it’s proved to be an exceptional tool for stripping bark or… apparently, shaving coconuts! It takes some getting used to and I’ve knicked myself with it quite a few times. And it’s very sharp. Once I finished with the knife, I hit the coconuts with a 120 grit sanding block to smooth everything out. I collected the sawdust — we’ll use that later!
Step 2 – Cut
There’s probably a better technique for this, but I just grabbed the coconut and started sawing right through the middle. I used an Irwin door jam saw because it was within reach and it felt like an appropriate tool. In hindsight, this was probably a terrible tool choice.
I cut through a bit, then attempted to drain the coconut milk. The first coconut was pretty dry, but the second was full.
After what felt like an hour, I had them both cracked open.
Step 3 – Clean Out
This was pretty straight forward. I used a razor blade to make deep slices in the coconut meat, then pried them out with a flathead screwdriver. Some of the chunks came out intact, which was surprisingly satisfying.
I left the coconut meat outside as an offering. It didn’t go to waste.
???
In this silly step, I hit everything with a blowtorch. The insides of the coconuts seemed a bit wet still and I didn’t want excessive moisture getting to my fillings. After a bit of fire, everything seemed much better off. Alternatively, the coconut shells could have been baked in the oven, but who has time for that? Also, my way was much more fun.
Want to hear about future posts? Subscribe to get notifications delivered straight to your inbox.
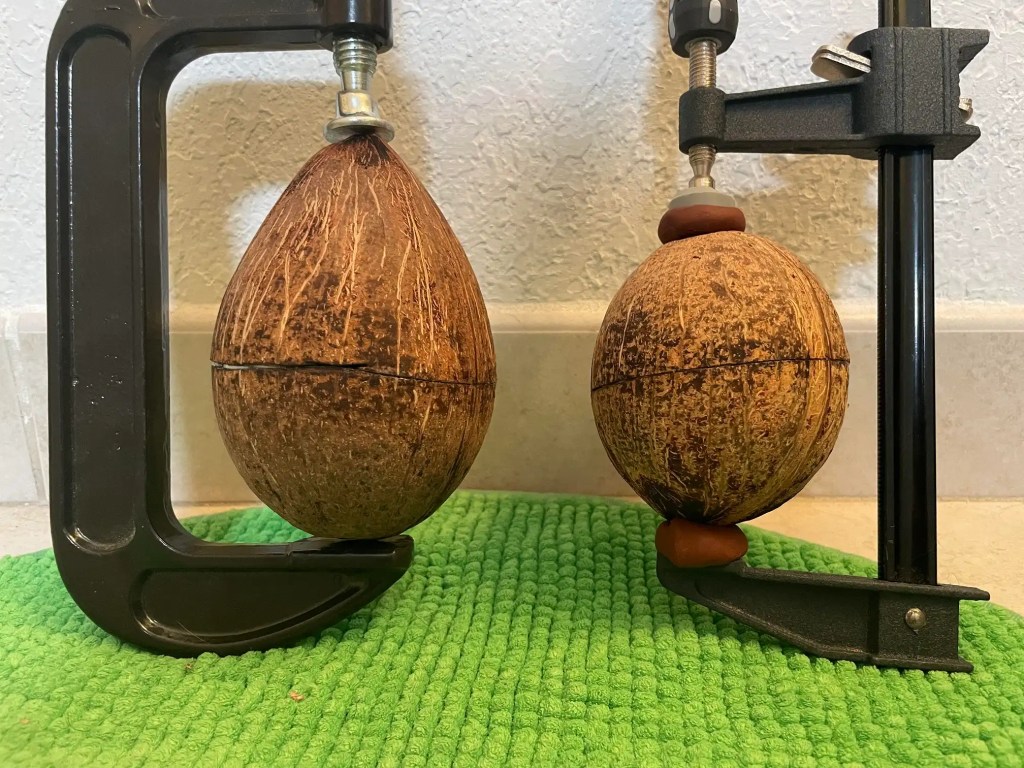
Step 4 – Fill and Glue
I filled one coconut with rice and the other with couscous, then used Gorilla wood glue to seal them back together. I wasn’t sure if wood glue would work well with coconuts, but it made a very tight bond. I clamped them together and left them overnight. The second coconut didn’t want to stay put in my clamp, so I used a bit of Sculpey on each end to help hold it in place.
I will say that I think the rice sounds better, but now I’m interested in hearing what a mix would sound like — or even different materials.
Step 5 – Finish
Once the glue had dried, I could see how terrible some of my initial cuts had been. I took the coconut dust I had collected during sanding, dumped it through a sifter (to remove the larger fibers) then mixed it with wood glue to make a paste. I filled all the cracks, let it sit overnight, then sanded it down. I started with 120 grit again, then moved to 220 and 320. I also used a Scotch Brite pad at the end, but that was just excessive.
I gave each coconut a couple coats of spray paint. I used Krylon Satin Black because I had extra from another crafting excursion, but I’m pretty sure any spray paint would do. This was also left to dry overnight.
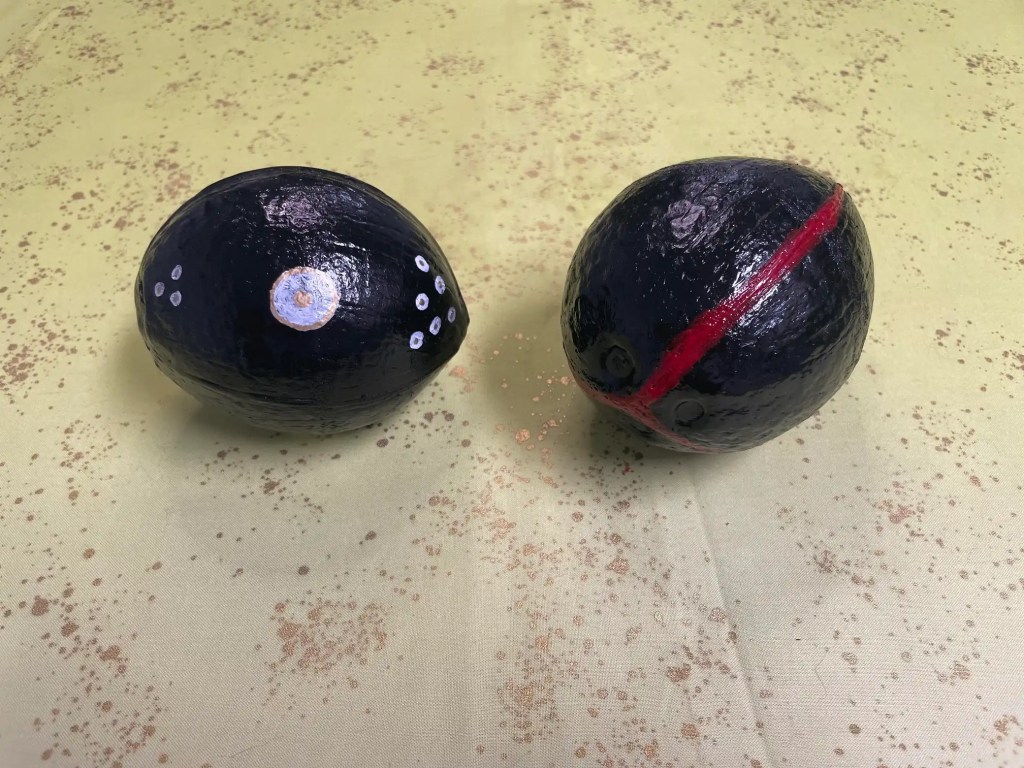
Step 6 – Decorate
Now that I had a nice smooth coat of black, it was time to start decorating. I gathered whatever paint supplies I could find around the house, which turned out to be a tube of acrylic red paint and some white and gold paint pens. I was really hoping to find some blue and green paint, but alas!
I really didn’t have a plan going into this. I had never decorated a coconut before. I think I was actually intending on making spirals, but that didn’t happen. On the first coconut, I just accentuated the ridges with red paint. On the second, I basically made a bunch of dots.
Now I’ll point out two facts:
- I’m not an artist
- It’s hard to paint at an angle under a camera
With those two things in mind, I can totally say the results were imperfect. If I had been in a different mindset, I might have gone back and touched up my mistakes, but I left them all.
All of those imperfections are permanent now because the last thing I did was coat the coconuts with Krylon Gloss Clear. Is that really the best finish to use on a coconut? I honestly have no idea, but it seems to have worked pretty well.
At the very least, I’ve got some unique creations.
Pictures of the Process
I didn’t take a picture every step of the way since I was mostly focused on the video. I did snap a few photos after some of the major break points.


Final Thoughts
I was going to record a clever introduction to the video, then talk about shakers afterward, but I had some technical difficulties. My mic was picking up way too much background noise, so I decided to just leave this as a crafting montage. I’ll make another video soon where I talk about shakers — and I’ll be sure to show off my new custom coconuts!.
If you have some ideas for any other musical instruments that can easily be created at home, please drop me a comment. Right now, I’m thinking I’ll have to try my hand at making a rain stick soon.
Remember: You can always find a way to make music. Until next time!
Hey! You made it to the end! This is the part where I remind you that I’ve used some Amazon referral links in this post. If you purchase something with those links, Amazon pays me a tiny commission. Now go get back to making instruments!


Leave a reply to gc1963 Cancel reply